Easy Frame Redo


Hello my friends !! Today I did a simple redo of the frame on a picture given to me. I didn't like the nasty green color the frame was so what do I do ? Repaint it ! Super simple. 
Here's what it looked like: 


The first step is to cover under the area where you will be painting. I did get the whole underneath covered as you'll see in the next pic. Gather everything you need: masking tape, paint brush, paint, razor blade, and optional Envirotex high gloss spray. 
Tape the inside edge where the glass is, like this:


I chose to use Martha Stewart Metallic Paint in the color "Antique Gold". It's what I used for the rest of the frames in my living room. You can get this at Home Depot. My brush is from a Martha Stewart brush set, and I got that at Michael's.


Next I painted the frame twice, letting it dry in between coats. 


When it was completely dry I sprayed on Envirotex High Gloss Clear Sealer. 
You can get this at Michael's. This part is optional, I used it mainly because I have it on hand.


After letting it sit for about an hour, it was done. It now will match the other frames in my living room. I love this color too, it's subtle shimmer is beautiful. :) What do you think ? 


What DIY crafts have you done ? 
I'd love to see what creative projects you've worked on. :)


Full Lips Review

Ok admit it, you want fuller lips. I know I do. Who doesn't right ?! If you are unable to or afraid of going under the knife, then you'll love this post. Read on......

So i'm sure you've seen some of the horror photos and videos that have been going around of teens using milk jugs or other household items to suck their lips into. Ugggh, don't even. Just don't. One of my fellow Y sisters had posted a photo of herself wearing this little round red thing over her lips, and it read something to the effect of "Easy way to get fuller lips." Of course I was curious and had to check it out for myself !!


The company is called FullLips. I went on their official page and placed an order for the medium oval. Well, it really wasn't the right one for me but I was in luck, the Founder of the company, Linda Gomez, had handwritten me a Thank You note with my order and included a free large round one. Good thing for me because it was the perfect one !! I was really impressed that the Founder had personally written me a Thank You note. Big A+ for personal-ness there. I friended her on FB and she is such a great lady. Really nice, and down to earth. 

As with most products out there, there are now many knock-offs. I recommend going to the official website here: www.fullips.com to order yours. 

Here is my before and right after photo


And here is me in the process
 

So.... what are you waiting for ?
Head on over to the official Fullips page !! 
Right here ~~~~~~~> www.fullips.com

Hope you found this review helpful. Let me know your thoughts on this product. 

September Reflections


September 23rd, 2015 = Happy Fall my friends. Time to pull out my jeans and hoodies !! The leaves here in New England will be changing to beautiful yellows, oranges and reds. I will have some photos in an upcoming post. :) 

Just some life reflection going on today as it's the anniversary of my Mom's passing. Today is 9 years. On September 9th was 8 years since my brother passed. September is a hard month for my family. Losing 2 close family members in 11 months and 14 days has been very difficult, something we all still struggle with on a daily basis. I just wanted to share some photos with you as I reflect on Mom & Tony. 

We do have a positive to look forward to in September, and that is my baby brothers Birthday. 

Tony & I in 1997

Mom & I in 1998
My memorial tattoos, the Arabic symbol reminds me of my Mom, she had a necklace with this symbol that I remember her wearing all the time. The black rabbit is from the movie Watership down, that reminds me of Tony, because we watched this movie so many times together growing up. Tony is "Bright Eyes".
 
 
Our bright light in the darkness that is September is my brother Chris.  
His Birthday is tomorrow, September 24th. <3


DIY Lip Scrub


I hate to be the one who says it, but Fall is here, which means Winter is next !! Can you say dry, chapped lips ?! Uggg, I know I don't like the way that feels. So..... I found a super easy do it yourself home remedy, and you probably already have the ingredients in your cupboards. I love DIY beauty products because you really know what's in there, just the all natural, good stuff !! 

What you need: 
Small covered jar
Brown sugar
Coconut oil
Optional: Uplift Eye Serum (Younique)
Vaseline

I just mixed the ingredients together, and at the end added a few drops of Younique's Uplift Eye Serum, then mixed together again, and spooned it into a small empty Yankee Candle glass jar. You gently rub this on your lips once a week for about a minute or two. 
( Hello yummy-ness ) Wipe off the excess, and top it with a Vaseline. That's it, your good to go !! 

This will make your lipstick / lipgloss / lipstain go on so much smoother and 
stay on a bit longer too !! :) 


Enjoy !! Let me know if you have any alterations or additions, I just may try it next time !!

DIY Trivets / Coasters


Hello hello ! Today I'm going to show you how to create your own custom ceramic trivets or coasters. These make great gifts because they're so personal. This example is a gift I made for one of my Elite Black Status Presenters in Younique. She was kind enough to help find an item that I really wanted, but wasn't for sale anywhere. So as I thank you to her, I made her 2 custom trivets with her team logo on them. :) 

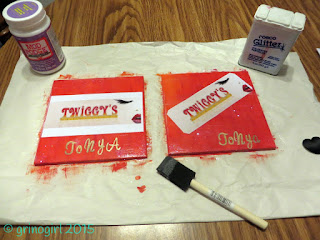
So first off, I go to Home Depot and buy the ceramic trivets or coasters. Trivets I buy 6x6 and for coasters I'll get the 4x4 size, usually four of them. Here you will see all the supplies needed. I have the trivets, paper with the logo that I had printed on heavier paper at Staples. Having the paper be a little bit heavier makes it go on much smoother with the Mod Podge, less air bubbles. I have my cutting board, Mod Podge, paints, and Envirotex Pour-On hardener, also, glitter !!


First, start by cutting your logo to the size needed, in this case, a 6x6. 
I decided to make one straight, and one tilted up to the right, because I wasn't sure which she would like better, so I'm giving her both. 


Next, I painted the background on the whole trivet, I wanted a fire orange-ish color, so it would match her logo. I did two coats after mixing the colors. Wait in between coat, for it to dry. Not very long, 20-30 minutes.


Next, place the paper logo where you want them, just to get a visual of where you will be placing the paper. This also helps to make sure it's cut down to size before applying the Mod Podge. 


Next, I add Mod Podge onto the back of the paper, and on the trivet, and then place the paper, sliding it ino the position you want it in. This is where you need to make sure the paper is very smooth, with no air bubbles in it. You can use a credit card, but craft stores also sell small a complete line of Mod Podge tools, the one I like is called a  After making sure it's completely flat, finish applying the Mod Podge to the whole trivet. This is also the first time I added glitter, while the trivet is drying, just sprinkled glitter all over. After this dries, I will do 2-3 more coats of Mod Podge, waiting for it to dry in between.  You can see from this photo below, there is a bit more sheen and gloss than the previous photo, which did not have any Mod Podge on it yet.

When the front is dry I will turn them over and add my art logo, which is a paw print from one of my cats. Yes, I actually made stencils of each of my 3 cats' paws, lol. This one here is from Moose. =) 

After the trivets are dried, next you prepare for the high gloss top coat. This is some serious stuff. It's called EnviroTex Lite. Make sure to read the directions carefully and be prepared. This part is optional, but I love it because it makes it so your item is waterproof, for life. And it gives the item a professional quality appearance. It comes in 2 two bottles, in this box. I also have my glitter ready, 4 plastic cups, mixing stick, disposable rubber gloves, a large piece of plastic, and a long lighter. First I prepare the area I am going to do this on, usually my porch. I will lay down the plastic, and right in the middle turn 2 of the cups upside down and place a trivet on each so they're up off the ground. Next, put on your rubber gloves !! I use the other two cups to do the mixing, which is very specific, and all inside the directions with this stuff. Once mixed, just pour it on in an even layer. Once it's covered, I will use a foam brush to go along the underneath edges, so the hard gloss doesn't have an many bumps once dry. I do this for a few minutes. Next, sprinkle more glitter. By this time the glass will be dripping down the sides, onto your plastic piece. Here is where you still start to see little tiny air bubbles on the top of the trivets. Use the lighter and hit each one until they all disappear. I usually keep looking on this part, for about 15 minutes because if you don't get the air bubbles out before the glass dries, they're permanent.


I will leave this out overnight, and in the morning it's all dried, and looks beautiful. What do you think, will she love it ?! 

Last step is to add the little rubber feet to the back. I learned that it's best to do this at the end, not before the gloss finish. You can see here the shiny edges would have been all bumpy drops if I didn't use the foam brush and keep wiping away the dripping from the gloss. Makes it much easier to add the feet and have it been as smooth as possible.

 And here is the final piece. =) 


I got all of the craft supplies at Micheal's Craft Store. The trivets come from Home Depot. I'd love to hear your comments or see some of your work !! Happy Crafting !! 

Here is a collage photo of some of the other trivets & coasters i've made ! :)


I will leave you with this awesome page showing how to prevent bubbles when using Mod Podge ! craftaholicsanonymous.net


Jellua SquidInk Shampoo & Conditioner


Good evening !! How are you all doing today ?! I received this incredible shampoo & conditioner set for my birthday and since I was so impressed, thought i'd share my opinion in case anyone is looking to try out a new product !! 
It's called Jellua Squid Ink Shampoo & Creme Conditioner. 
You can get this at Salons, so it is a bit pricey, but definitly a must try, IMHO.

First off, it has a very unique smell, I've just sat here smelling it, trying to think of a word to describe the smell, and all i've come up with is a clean, slightly mint smell. All I know for sure is that I could pick this stuff out, just by that unique smell. It's not a bad smell, I actually like it. You'll just have to try it out and tell me what you think it smells like, ok ?

After my first use of both the shampoo & conditioner, I really noticed my hair was much softer, my hair felt, "lighter" and more bouncy. And that smell, it lasts !! My guess this is a go for men too, since my brother tried it, and loved it !! Any guesses what he commented on ? Yup, that smell !!! =) 

Overall, I would recommend this to anyone who is in the market for softer, more bouncy hair. I will leave the official link below, but you can always feel free to do your own searching for better prices. I do know eBay sells the small trial sizes.  Leave your comments below, i'd love to hear what your thoughts are on this product !! 


Misha*Bella ~ eBay Store

Hi ! Do you love shopping online ? I have an eBay store your welcome to browse through. I am always adding new and pre-loved items to my store, Misha*Bella.
I sell mostly women's clothing and accessories. =)

Click the photo to be taken to the store !!

http://stores.ebay.com/misha-bella?_rdc=1


Southwicks Zoo

Yesterday I went to Southwicks Zoo in Mendon, MA with my friend Earl, his daughter Livie, and his Mom Val. It took us about an hour to get there. We were one of the first in, so that was nice. It was a beautiful day. Livvie was so cute, and she loved the whole day. She was actually asking to go home to take a nap she was so tired, hahaha..... 
We saw all kinds of animals and had a great day. Enjoy the photos ! 

Me, Livie & Earl
Val, Livie & Earl


If you'd like more information, and get visit the zoo, take a look at their website:


Parissa Brow Shaper

Ladies and Gents, I have to tell you about a new product I just tried, it's pretty much the BEST at home wax for your eyebrows. Now I can extend my salon visits to double the time !! I have tried many many different hair removal options for my eyebrows and nothing even comes close to the ease and precision of this stuff. You have to check it out. It's so easy, and it works wonders !!! I just had to share because this stuff is the bomb !! 


Meet the Girls

Hello ! Happy Saturday everyone ! 

My 3 girls are a huge part of my life. They bring me so much joy, laughter, and happiness. They are my kids, they are my cats.  ~MEOW~


Moose is our 14 year old Calico. She is a sweet, super snuggly kitty. She loves to lounge around, and isn't very picky when it comes to food. Lol. 


Molly is our 7 year old Calico. She is the diva of the house. She is super snuggly, on her terms. She bounces between sweet girl, and diva pretty quickly. 


Misha is the baby. She is almost 4, and a F4 Bengal cat. She is the resident supermodel. She loves to have her picture taken, well, most of the time. She is super energetic and gets along great with Moose. Her and Molly are growling one minute, and playing together the next. 


I can't even begin to explain my love for these girls. 
They are very lucky to have me as their kitty mama !! <3 

They are also the inspiration for my Younique Team name: 
The Lash Cats ;)  { logo coming soon }

Joining Younique

I'm going to share with you WHY I joined Younique. I have been with quite a few different network marketing companies and so I know a little bit about the business. I will tell you in my opinion, Younique blows the rest of them away. First off, we are part of something much bigger, The Younique Foundation. The Younique Foundation was created to help women who have been sexually abused. A retreat for women to go and enjoy themselves, and begin the healing process. What a beautiful way for our Founders, Derek & Melanie, to give back. 

Here is my short "Why" video. 


So what do you get when you join, you ask ?! 

ALL for $99.00 US~
Moodstruck 3D Fiber Lashes+
Moodstruck Addiction Shadow Palette 1†
Precision Pencil in Perfect
Opulence Lipstick in Upscale
Splurge Cream Shadow in Tenacious
Cream Shadow Brush
Lucrative Lip Gloss in Lovesick
Skin Care Sampler
Pigment Sampler
Bronzer Sampler
Blusher Sampler‡
Shade Stick for Mineral Touch Cream and Powder Foundations 
and BB Flawless Complexion Enhancer
White Status Charm (on purple ring)
Free business website
Instant Access to the Younique Virtual Party System™ (start hosting parties immediately)
$25 USD in Younique Cash on your birthday, annually
PayQuicker Younique bank account
September 2015 Younique Cosmetics and Skincare Catalog
Younique Presenter Guide
All of this comes in our signature black faux leather, embossed Younique case

https://www.youniqueproducts.com/batalash3d/business/presenterinfo#.VeW7r5d0aLU
September 2015 Presenter Kit


Click the photo to be taken to the webpage where you can learn more about becoming a Younique Presenter and joining this amazing Y sisterhood. :)

About Ronnie

I am just a girl from northern Massachusetts who loves spending time with my cats, reading, doing crafts and spreading happiness wherever I can. I am a CphT, and a MA Notary Public.

IMPORTANT LINKS

DISCLAIMER

Disclaimer for grinogirlvp.blogspot.com
If you require any more information or have any questions about our site's disclaimer, please feel free to contact us by email at Ronnie.

All the information on this website is published in good faith and for general information purpose only. grinogirlvp.blogspot.com does not make any warranties about the completeness, reliability and accuracy of this information. Any action you take upon the information you find on this website (grinogirlvp.blogspot.com), is strictly at your own risk. grinogirlvp.blogspot.com will not be liable for any losses and/or damages in connection with the use of our website.

Please be also aware that when you leave our website, other sites may have different privacy policies and terms which are beyond our control. Please be sure to check the Privacy Policies of these sites as well as their "Terms of Service" before engaging in any business or uploading any information.

Consent
By using our website, you hereby consent to our disclaimer and agree to its terms.

Update
This site disclaimer was last updated on: Sunday, October 25th, 2015· Should we update, amend or make any changes to this document, those changes will be prominently posted here.