Hello hello ! Today I'm going to show you how to create your own custom ceramic trivets or coasters. These make great gifts because they're so personal. This example is a gift I made for one of my Elite Black Status Presenters in Younique. She was kind enough to help find an item that I really wanted, but wasn't for sale anywhere. So as I thank you to her, I made her 2 custom trivets with her team logo on them. :)
So first off, I go to Home Depot and buy the ceramic trivets or coasters. Trivets I buy 6x6 and for coasters I'll get the 4x4 size, usually four of them. Here you will see all the supplies needed. I have the trivets, paper with the logo that I had printed on heavier paper at Staples. Having the paper be a little bit heavier makes it go on much smoother with the Mod Podge, less air bubbles. I have my cutting board, Mod Podge, paints, and Envirotex Pour-On hardener, also, glitter !!
First, start by cutting your logo to the size needed, in this case, a 6x6.
I decided to make one straight, and one tilted up to the right, because I wasn't sure which she would like better, so I'm giving her both.
Next, I painted the background on the whole trivet, I wanted a fire orange-ish color, so it would match her logo. I did two coats after mixing the colors. Wait in between coat, for it to dry. Not very long, 20-30 minutes.
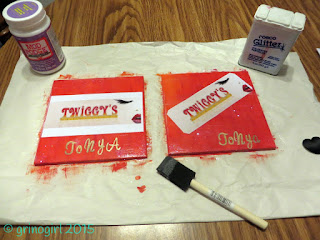
Next, place the paper logo where you want them, just to get a visual of where you will be placing the paper. This also helps to make sure it's cut down to size before applying the Mod Podge.
Next, I add Mod Podge onto the back of the paper, and on the trivet, and then place the paper, sliding it ino the position you want it in. This is where you need to make sure the paper is very smooth, with no air bubbles in it. You can use a credit card, but craft stores also sell small a complete line of Mod Podge tools, the one I like is called a After making sure it's completely flat, finish applying the Mod Podge to the whole trivet. This is also the first time I added glitter, while the trivet is drying, just sprinkled glitter all over. After this dries, I will do 2-3 more coats of Mod Podge, waiting for it to dry in between. You can see from this photo below, there is a bit more sheen and gloss than the previous photo, which did not have any Mod Podge on it yet.
When the front is dry I will turn them over and add my art logo, which is a paw print from one of my cats. Yes, I actually made stencils of each of my 3 cats' paws, lol. This one here is from Moose. =)
After the trivets are dried, next you prepare for the high gloss top coat. This is some serious stuff. It's called EnviroTex Lite. Make sure to read the directions carefully and be prepared. This part is optional, but I love it because it makes it so your item is waterproof, for life. And it gives the item a professional quality appearance. It comes in 2 two bottles, in this box. I also have my glitter ready, 4 plastic cups, mixing stick, disposable rubber gloves, a large piece of plastic, and a long lighter. First I prepare the area I am going to do this on, usually my porch. I will lay down the plastic, and right in the middle turn 2 of the cups upside down and place a trivet on each so they're up off the ground. Next, put on your rubber gloves !! I use the other two cups to do the mixing, which is very specific, and all inside the directions with this stuff. Once mixed, just pour it on in an even layer. Once it's covered, I will use a foam brush to go along the underneath edges, so the hard gloss doesn't have an many bumps once dry. I do this for a few minutes. Next, sprinkle more glitter. By this time the glass will be dripping down the sides, onto your plastic piece. Here is where you still start to see little tiny air bubbles on the top of the trivets. Use the lighter and hit each one until they all disappear. I usually keep looking on this part, for about 15 minutes because if you don't get the air bubbles out before the glass dries, they're permanent.
I will leave this out overnight, and in the morning it's all dried, and looks beautiful. What do you think, will she love it ?!
Last step is to add the little rubber feet to the back. I learned that it's best to do this at the end, not before the gloss finish. You can see here the shiny edges would have been all bumpy drops if I didn't use the foam brush and keep wiping away the dripping from the gloss. Makes it much easier to add the feet and have it been as smooth as possible.
And here is the final piece. =)
I got all of the craft supplies at Micheal's Craft Store. The trivets come from Home Depot. I'd love to hear your comments or see some of your work !! Happy Crafting !!
I will leave you with this awesome page showing how to prevent bubbles when using Mod Podge ! craftaholicsanonymous.net


0 comments:
Post a Comment